
[ad_1]
I will introduce the PyTorch Wrapper in this tutorial, conserving us time when producing the PyTorch styles schooling pipeline. We’ll be ready to do this in blocks!
Welcome everyone back to my other tutorial. Very last time I confirmed you how to prepare a very simple PyTorch model, this was an introduction to PyTorch in which I confirmed you how to teach an MNIST classifier with Convolutional Neural Networks.
We realized a high accuracy amount of 97–98%, which means it is pretty correct. But which is a easy endeavor for the reason that the MNIST has a huge and basic dataset.
I lined how to down load MNIST details with personalized capabilities, preprocess it, and convert it into batches. I confirmed you how to construct our Neural Network model with CNNs and how to print its summary.
We described the Optimizer and the Loss purpose. We designed train and examination functions to coach and validate our Model for 5 epochs. Finally, I showed you how to save the Product on disk and later on load it even though functioning test inference. Correct now, we’ll do the same stuff but use distinct objects and functions (The Wrapper).
PyTorch Wrapper
I was doing work on a custom made PyTorch wrapper that is involved in my Equipment Mastering Schooling Utilities model 1..1. This model supports TensorFlow and PyTorch implementations. You can put in it with “pip put in mltu==1..1“.
It is easy when we talk about TensorFlow. It presently supports a modular training pipeline, wherever we require to insert callbacks and metrics and operate the fit operate to initiate the training pipeline. For PyTorch, I had to put into practice this sort of functionality.

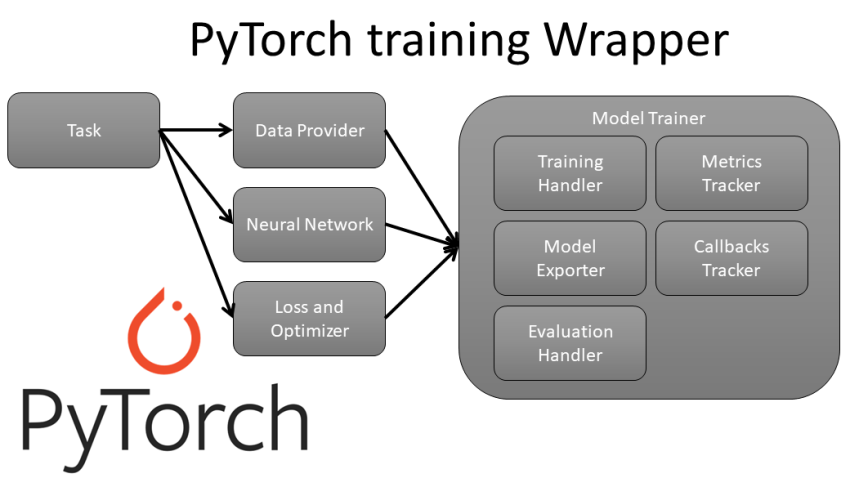
From the earlier mentioned graphic, you can see that making use of this offer, we have to have only to outline our Info Service provider, Neural Community architecture, Decline, and Optimizers, and if we have to have to build Metrics and Callbacks. The entire education pipeline will be managed by us!
This module will support us although investing time constructing a instruction pipeline in PyTorch, and we’ll have much more time on other things, like data preprocessing or model architecture.
In the starting, we are downloading and preprocessed the MNIST dataset the identical as right before:
Now we need to have to import personalized Wrapper objects that we’ll use to train the Design. I am importing DataProvider – it handles details loading in batches in a multithreading/multiprocessing way. Then I import Product – the key object in which all the magic comes about. Then it truly is Accuracy as a substitute of hardcoding the precision calculation, it will be handled in Metrics. Then, ultimately, we import EarlyStopping and ModelCheckpoint, these two objects will track the full coaching system, end coaching at its ideal position, and help save the greatest product weights to our path every time it enhances.
Now we require to produce a preprocessor purpose that will extend my single picture dimension and normalize facts in between and 1.
Good, now we need to have to create teaching and validation knowledge providers. It’s as simple as defining them with our datasets, attaching the preprocessor to the info_preprocessors list, and outline our info batch_size:
Superb now we determine the network (the same as I utilised in the prior tutorial). We define the Optimizer as Adam, with a mastering price of .001. And we need to try to remember to outline our loss and use the CrossEntropyLoss for the MNIST classification task.:
Listed here is my Neural Community architecture that is lying in my product.py file:
Bear in mind we imported two callbacks? Now we require to initialize them:
To start with, we determine the EarlyStopping callback, which will be accountable for stopping the training process when our Design stops increasing for a specified quantity of epochs. In this article we are monitoring validation precision because there is no place in monitoring instruction accuracy. And since we are seeking to optimize this Accuracy, we set the manner as “max”.
2nd, we are initializing ModelCheckpoint. The identify speaks for itself any time we obtain superior validation precision than we experienced in advance of, we conserve our Design on disk to a specified locale. As perfectly we established the method to “max”.
So, we outlined most of the stuff. We need to initialize the Design object with our Neural Network architecture, Optimizer, Loss, and Metrics. This operates in the same way as we do model.compile() in TensorFlow:
When our Design is outlined, we can start out the training approach. So, what is still left? We need to start off the teaching system. We can do this by calling product.fit function and by defining our coaching and validation info vendors, the variety of epochs to practice, and by feeding callbacks:
And now, we need to hold out for it to end the coaching method:
As you can see, the Model stopped instruction on 13 epochs with a validation accuracy of 98.7%. We didn’t require to worry whether or not it educated as well prolonged or too short, and about conserving the model, anything was dealt with for us.
Is not this interesting? I skipped this when utilizing PyTorch to produce many Neural Networks’ sleek and tidy schooling pipelines, which I now share with you!
Take a look at the Model:
Now that we have skilled our PyTorch model employing the MLTU wrapper, it is time to test it on some new knowledge to assess its effectiveness. We can load the saved product employing the adhering to code:
We can now use this model to make predictions on new information. Let us load some new take a look at data working with the similar preprocessing functionality we employed for the education data:
We can now pass this preprocessed check information as a result of our educated design to make predictions:
The output of the network function will be a tensor that contains the predicted course probabilities for every single input graphic. We use the output to get the predicted class label for each and every output.argmax purpose. We can now visually compare these predicted labels with the ground reality labels for the take a look at details to evaluate the accuracy of our design:

If we went by way of all the check datasets, we would see the same accuracy of 98.7%, which is very close to the validation accuracy we achieved for the duration of teaching. This suggests that our model performs perfectly and can generalize to new knowledge!
I am not covering the particulars of how each item is effective and how you can apply this to your uses. In far more detail, I describe each and every section in my YouTube movie tutorial, which you really should unquestionably examine out if you want to use all of this in your initiatives.
This venture still needs to include things like a good deal of things, but this is my initially launch of the MLTU deal that supports PyTorch. I’ll continue to keep growing its functionalities of it in the long term. In general, this kind of training pipeline can be reused in several other projects, which I advocate you do.
So, if you are eager to know how this job evolves, subscribe to my YouTube channel, stick to my GitHub repository, and wait around for updates!
The complete code for this tutorial you can locate in this GitHub link.
[ad_2]
Resource url