
The Apple Watch Series 3 has been a faithful companion for countless individuals, helping them stay connected, track their health, and manage their daily activities. However, accidents happen, and the screen of your cherished wearable may suffer damage. When this occurs, many people believe that their only option is to replace the entire device. But fear not, because in this comprehensive guide, we will explore the process of Apple Watch Series 3 screen replacement, saving you both money and the environment.
Disclaimer: Replacing the screen of your Apple Watch Series 3 is a delicate procedure that requires patience and some technical skill. If you are uncertain about your ability to perform this repair, it is strongly recommended to seek professional assistance from an authorized Apple service provider or a skilled technician.
Understanding the Apple Watch Series 3 Screen
Before we dive into the replacement process, let’s take a moment to understand the apple watch series 3 screen replacement . The screen is a crucial component of the device, responsible for displaying information, touch interactions, and overall usability. It is made of durable materials but can still be susceptible to damage from impacts, scratches, or other accidents.
Signs You Need a Screen Replacement
Here are some common signs that indicate it’s time to replace the screen of your Apple Watch Series 3:
Cracks and Shattered Glass: Obvious cracks, shattered glass, or deep scratches on the screen hinder visibility and can lead to further damage if not addressed promptly.
Unresponsive Touchscreen: If your touchscreen becomes unresponsive, registers incorrect touches, or has areas that do not respond to touch, this may be due to screen damage.
Display Artifacts: Display artifacts like lines, discoloration, or flickering can indicate screen damage or a faulty connection between the screen and internal components.
Water Damage: If your Apple Watch has been exposed to water or moisture and the screen displays abnormalities, it may require replacement to restore proper functionality.
Tools and Materials Needed
Before you begin the screen replacement process, gather the necessary tools and materials:
Replacement Screen: Ensure you have a compatible replacement screen specifically designed for the Apple Watch Series 3.
Precision Screwdriver Set: You’ll need a set of precision screwdrivers, including Phillips and Pentalobe bits, to access the watch’s internals.
Plastic Pry Tools: Plastic pry tools or opening picks are essential for safely opening the watch without causing further damage.
Adhesive: You may require adhesive to secure the new screen in place, depending on the replacement kit you purchase.
Heat Source: A heat source, such as a heat gun or hair dryer, is useful for softening adhesive during disassembly.
The Replacement Process
Now, let’s walk through the steps involved in replacing the screen of your Apple Watch Series 3:
Prepare Your Workspace: Find a clean, well-lit, and organized workspace where you can perform the repair without distractions. Ensure you have all your tools and materials within reach.
Power Off Your Apple Watch: Before starting the repair, power off your Apple Watch to prevent any accidental damage or electrical shock.
Remove the Straps: Detach the watch straps from both sides of the watch, making it easier to work with the device.
Heat the Edges: Use a heat source (heat gun or hair dryer) to gently warm the edges of the watch. This softens the adhesive, making it easier to open the device.
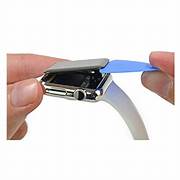
Carefully Pry Open: Insert a plastic pry tool or opening pick between the screen and the watch’s casing. Slowly and gently work your way around the edge, releasing the adhesive. Take your time to avoid damaging the internal components.
Disconnect the Battery: Once you’ve successfully opened the watch, locate the battery and disconnect it to ensure your safety during the repair.
Remove the Damaged Screen: Carefully remove the damaged screen by undoing the screws holding it in place. Keep track of the screws and their locations, as they may be different sizes.
Install the New Screen: Position the replacement screen in place and secure it with the screws. Reconnect the battery.
Reassemble the Watch: Reverse the steps you took to open the watch. Apply new adhesive if required. Carefully snap the watch back together, making sure everything is aligned correctly.
Test the Screen: Power on your Apple Watch and test the new screen for responsiveness and clarity. Ensure that touch functions work as expected.
Seeking Professional Help
It’s important to note that replacing the screen of your Apple Watch Series 3 is a delicate procedure, and there is a risk of causing further damage if not done correctly. If you are uncomfortable with the DIY approach or have concerns about voiding your warranty, it’s advisable to seek professional assistance from an authorized Apple service provider or a skilled technician.
Conclusion
Accidents happen, and when they do, the screen of your Apple Watch Series 3 may become damaged. Rather than replacing the entire device, you can save both money and the environment by replacing the screen yourself, following the steps outlined in this guide. However, always exercise caution and consider seeking professional help if you’re uncertain about your repair skills. Restoring the clarity of your Apple Watch Series 3 screen is a satisfying and cost-effective way to keep your trusted companion in top-notch condition.