
[ad_1]
A complete end-to-end example of serving an ML model for image classification task

This post will walk you through a process of serving your deep learning Torch model with the TorchServe framework.
There are quite a bit of articles about this topic. However, typically they are focused either on deploying TorchServe itself or on writing custom handlers and getting the end results. That was a motivation for me to write this post. It covers both parts and gives end-to-end example.
The image classification challenge was taken as an example. At the end of the day you will be able to deploy TorchServe server, serve a model, send any random picture of a clothes and finally get the predicted label of a clothes class. I believe this is what people may expect from an ML model served as API endpoint for classification.
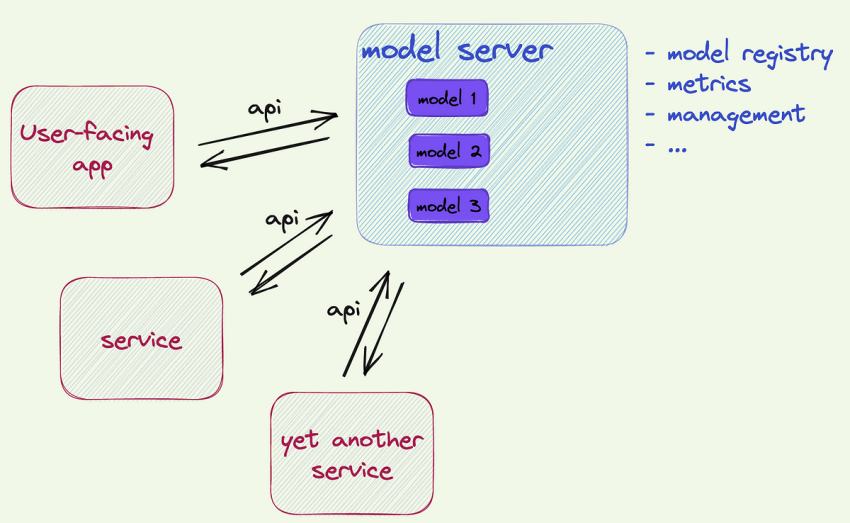
Say, your data science team designed a wonderful DL model. It’s a great accomplishment with no doubts. However, to make a value out of it the model needs to be somehow exposed to the outside world (if it’s not a Kaggle competition). This is called model serving. In this post I’ll not touch serving patterns for batch operations as well as streaming patterns purely based on streaming frameworks. I’ll focus on one option of serving a model as API (never mind if this API is called by a streaming framework or by any custom service). More precisely, this option is the TorchServe framework.
So, when you decide to serve your model as API you have at least the following options:
- web frameworks such as Flask, Django, FastAPI etc
- cloud services like AWS Sagemaker endpoints
- dedicated serving frameworks like Tensorflow Serving, Nvidia Triton and TorchServe
All have its pros and cons and the choice might be not always straightforward. Let’s practically explore the TorchServe option.
The first part will briefly describe how a model was trained. It’s not important for the TorchServe however I believe it helps to follow the end-to-end process. Then a custom handler will be explained.
The second part will focus on deployment of the TorchServe framework.
Source code for this post is located here: git repo
For this toy example I selected the image classification task based on FashionMNIST dataset. In case you’re not familiar with the dataset it’s 70k of grayscale 28×28 images of different clothes. There are 10 classes of the clothes. So, a DL classification model will return 10 logit values. For the sake of simplicity a model is based on the TinyVGG architecture (in case you want to visualize it with CNN explainer): simply few convolution and max pooling layers with RELU activation. The notebook model_creation_notebook in the repo shows all the process of training and saving the model.
In brief the notebook just downloads the data, defines the model architecture, trains the model and saves state dict with torch save. There are two artifacts relevant to TorchServe: a class with definition of the model architecture and the saved model (.pth file).
Two modules need to be prepared: model file and custom handler.
Model file
As per documentation “A model file should contain the model architecture. This file is mandatory in case of eager mode models.
This file should contain a single class that inherits from torch.nn.Module.”
So, let’s just copy the class definition from the model training notebook and save it as model.py (any name you prefer):
Handler
TorchServe offers some default handlers (e.g. image_classifier) but I doubt it can be used as is for real cases. So, most likely you will need to create a custom handler for your task. The handler actually defines how to preprocess data from http request, how to feed it into the model, how to postprocess the model’s output and what to return as the final result in the response.
There are two options — module level entry point and class level entry point. See the official documentation here.
I’ll implement the class level option. It basically means that I need to create a custom Python class and define two mandatory functions: initialize and handle.
First of all, to make it easier let’s inherit from the BaseHandler class. The initialize function defines how to load the model. Since we don’t have any specific requirements here let’s just use the definition from the super class.
The handle function basically defines how to process the data. In the simplest case the flow is: preprocess >> inference >> postprocess. In real applications likely you’ll need to define your custom preprocess and postprocess functions. For the inference function for this example I’ll use the default definition in the super class:
Preprocess function
Say, you built an app for image classification. The app sends the request to TorchServe with an image as payload. It’s probably unlikely that the image always complies with the image format used for model training. Also you’d probably train your model on batches of samples and tensor dimensions must be adjusted. So, let’s make a simple preprocess function: resize image to the required shape, make it grayscale, transform to Torch tensor and make it as one-sample batch.
Postprocess function
A multiclass classification model will return a list of logit or softmax probabilities. But in real scenario you’d rather need a predicted class or a predicted class with the probability value or maybe top N predicted labels. Of course, you can do it somewhere in the main app/other service but it means you bind the logic of your app with the ML training process. So, let’s return the predicted class directly in the response.
(for the sake of simplicity the list of labels is hardcoded here. In github version the handler reads is from config)
Ok, the model file and the handler are ready. Now let’s deploy TorchServe server. Code above assumes that you have already installed pytorch. Another prerequisite is JDK 11 installed (note, just JRE is not enough, you need JDK).
For TorchServe you need to install two packages: torchserve and torch-model-archiver.
After successful installation the first step is to prepare a .mar file — archive with the model artifacts. CLI interface of torch-model-archiver is aimed to do it. Type in terminal:
torch-model-archiver --model-name fashion_mnist --version 1.0 --model-file path/model.py --serialized-file path/fashion_mnist_model.pth --handler path/handler.py
Arguments are the following:
–model name: a name you want to give to the model
–version: semantic version for versioning
–model file: file with class definition of the model architecture
–serialized file: .pth file from torch.save()
–handler: Python module with handler
As a result the .mar file called as model name (in this example fashion_mnist.mar) will be generated in the directory where CLI command is executed. So, better to cd to your project directory before calling the command.
Next step finally is to start the server. Type in terminal:
torchserve --start --model-store path --models fmnist=/path/fashion_mnist.mar
Arguments:
–model store: directory where the mar files are located
–models: name(s) of the model(s) and path to the corresponding mar file.
Note, that model name in archiver defines how your .mar file will be named. The model name in torchserve defines the API endpoint name to invoke the model. So, those names can be the same or different, it’s up to you.
After those two command the server shall be up and running. By default TorchServe uses three ports: 8080, 8081 and 8082 for inference, management and metrics correspondingly. Go to your browser/curl/Postman and send a request to
http://localhost:8080/ping
If TorchServe works correctly you should see ‘status’: ‘Healthy’

A couple of hints for possible issues:
1. If after torchserve -start command you see errors in the log with mentioning “..no module named captum” then install it manually. I encountered this error with the torchserve 0.7.1
2. It may happen that some port is already busy with another process. Then likely you will see ‘Partially healthy’ status and some errors in log.
To check which process uses the port on Mac type (for example for 8081):
sudo lsof -i :8081
One option can be to kill the process to free the port. But it might be not always a good idea if the process is somehow important.
Instead it’s possible to specify any new port for TorchServe in a simple config file. Say, you have some application which is already working on 8081 port. Let’s change the default port for TorchServe management API by creating torch_config file with just one line:
management_address=https://0.0.0.0:8443
(you can choose any free port)
Next we need to let TorchServe know about the config. First, stop the unhealthy server by
torchserve --stop
Then restart it as
torchserve --start --model-store path --models fmnist=/path/fashion_mnist.mar --ts-config path/torch_config
At this step it’s assumed the server is up and running correctly. Let’s pass a random clothes image to the inference API and get the predicted label.
The endpoint for inference is
http://localhost:8080/predictions/model_name
In this example it’s http://localhost:8080/predictions/fmnist
Let’s curl it and pass an image as
curl -X POST http://localhost:8080/predictions/fmnist -T /path_to_image/image_file
for example with the sample image from the repo:
curl -X POST http://localhost:8080/predictions/fmnist -T tshirt4.jpg
(X flag is to specify the method /POST/, -T flag is to transfer a file)
In the response we should see the predicted label:

Well, by following along this blog post we were able to create a REST API endpoint to which we can send an image and get the predicted label of the image. By repeating the same procedure on a server instead of local machine one can leverage it to create an endpoint for user-facing app, for other services or for instance endpoint for streaming ML application (see this interesting paper for a reason why you likely should not do that: https://sites.bu.edu/casp/files/2022/05/Horchidan22Evaluating.pdf)
Stay tuned, in the next part I’ll expand the example: let’s make a mock of Flask app for business logic and invoke an ML model served via TorchServe (and deploy everything with Kubernetes).
A simple use case: user-facing app with tons of business logic and with many different features. Say, one feature is uploading an image to apply a desired style to it with a style transfer ML model. The ML model can be served with TorchServe and thus the ML part will be completely decoupled from business logic and other features in the main app.
[ad_2]
Source link